In this page, we will share details of how to build qNinja and qNinja Lite from scratch including lasercutting woods, ordering PCB to China, soldering small chips onto PCB precisely by hand, writing firmware.
Essential tools
Following tools are required to make all parts. We will sell core parts so that you can skip some of them.
Laser Cutter (Unknown min price)
Laser cutter is used to cut MDF wooden board to make a box outside. Ours is Etcher Laser Pro, 30W CO2 laser with work area up to 475x310mm.
FDM 3d printer ($200~)
Few parts must be 3d printed using black PLA filament. Typical fused deposition modeling 3d printer is enough. Ours is Ultimaker2+ with 0.4mm nozzle.
Glass Cutter ($900+)
Optical filters must be cut precisely. Astellatech’s ULTILE with proper options is best for this purpose.
Reflow Oven ($160)
Reflow oven is one of the solutions to solder small SMD chips onto PCB at once. Ours is T-962. Our solder stencil has 4 holes for pushpins (0.9mm diameter) to be hold. Lead-free low temperature solder paste like this makes it easier. Soldering rod is also needed to solder large DIP parts.
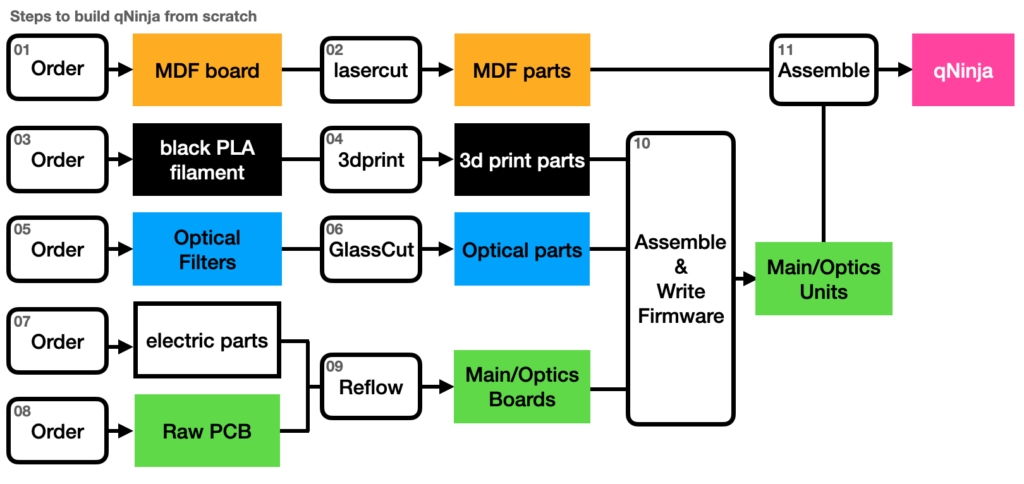
Detailed Steps
| ID | Title | Blog Post |
| 01 | Order MDF | ReadMe |
| 02 | Lasercut MDF | ReadMe |
| 03 | Order Filament | ReadMe |
| 04 | 3D Printing | ReadMe |
| 05 | Order Optical Filters | Not Yet |
| 06 | Glass Cut | Not Yet |
| 07 | Order Electric Parts | Not Yet |
| 08 | Order PCB | ReadMe |
| 09 | Reflow and Solder | Not Yet |
| 10 | Assemble and Write Firmware | Not Yet |
| 11A | How to Assemble qNinja Kit | Not Yet |
| 11B | How to Assemble qNinja Lite Kit | Not Yet |